Archive

How to solve the redirection error of your hacked website and, how to get back your hacked website

Are you facing a redirection error? Your site is redirecting to some spam URLs? When you want to access your site and suddenly you see that your site is navigating to somewhere else. Do you want to solve the redirection error? Honestly, I can tell you that it’s a very hard and time-consuming process to find where the issue is. It does not happen automatically its often happens when some hacker gains access to your site and adds spam URLs in parts of your website. In this article, I am going to explain the solution to this redirection issue from my personal experience. After following this guide you will be able to solve your issue but I will share my experience so maybe you can solve your error by following this guide. I will tell you the whole of the situations I faced and how I solved it.

A new client who wanted to shift his sites to Cyberhosting told us that one of his sites is facing redirection issues and he is not even able to gain access to the WordPress admin dashboard. Before telling you the whole store I will state some points which are maybe the cause of the redirection issues.

  1. Outdated Plugins
  2. Change URLs in the Databases
  3. Default themes files
  4. WordPress Files
  5. General settings URLs

I would like to start one by one the problems encountered and tell you how I solved the problems that I faced. Honestly, speaking that the main part is to find where is the problem. Once you get that 80% of the problem is solved (From my point of view may be in your case your view is different). Now I am going to tell you the whole story of problems and solutions with intervals 🙂 .

Infected Database Problem:

When i face this problem for the first time. It was very complicated at that point I was unable even to gain access to the WordPress admin dashborad. Its very tough to know the reason if your first problem is accessing the WP_ADMIN. In this case I decided on a brief check before going into deep analysis of files and searching for the problem there. One of our team members suggested to me to check the database and it was here in the WordPress setting that I discovered the URLS have been changed. So, your first question is where are the URLs in the database? I am going to tell you the way to check and solve the issue.

How to check and solve the Database issue:

First of all, you have to know where to access your database. If you are familiar with the PHPMyadmin in your control panel and know how to access then you can leave this part and access the database of your WordPress which you need to fix. Otherwise, stay with me and follow the guide. Here I will tell you how to access the database in CyberPanel. if you have any other panel go and search for the access process.

How to access database using PHPMyadmin in CyberPanel

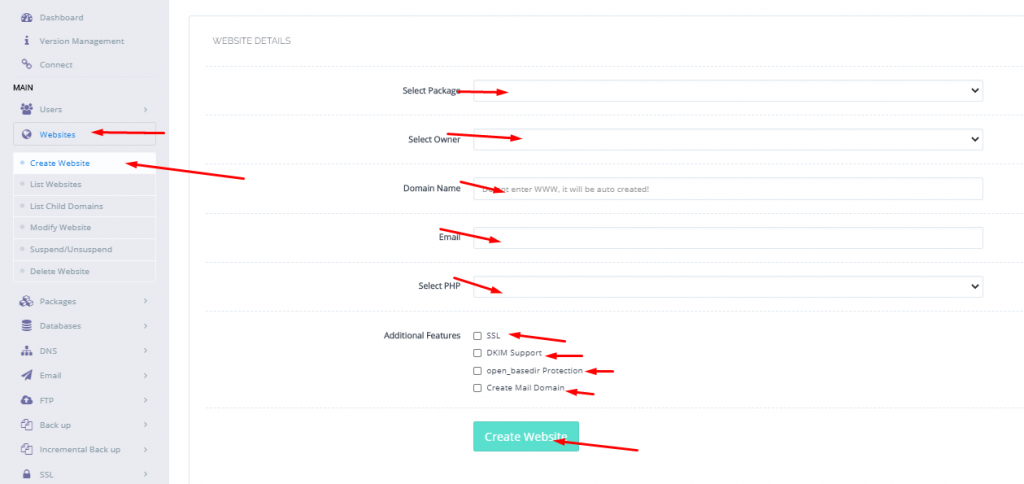
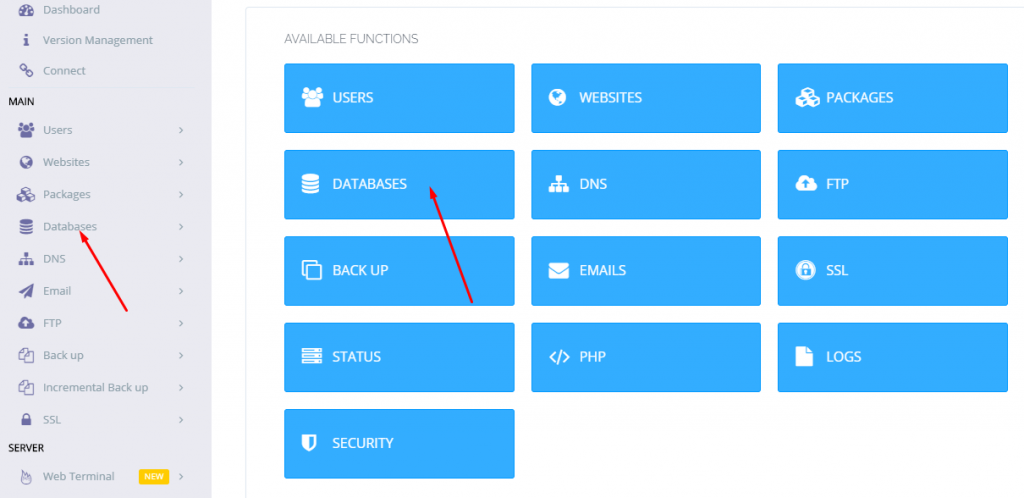
Its very easy to access PHPMyadmin in CyberPanel. (Easy for me may be hard for you ). First of all go to the Database->PHPMyadmin.

solve the redirection error

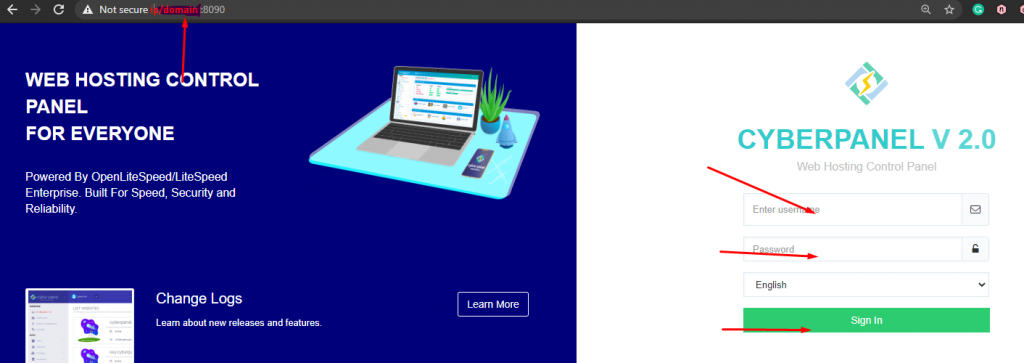
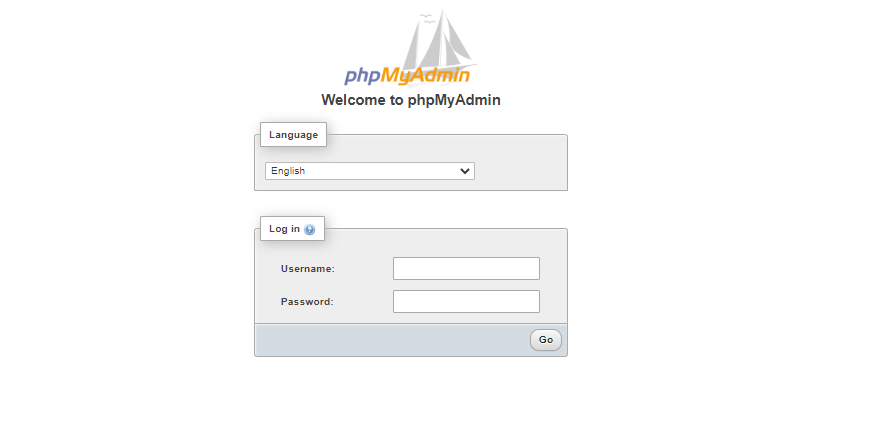
You will see this screen which asks you to provide the credentials to login provide.

image 4

But what if you don’t have the credentials to log in. Actually, when I was investigating I also didn’t have the credentials to log in. But wait don’t worry I will tell you from where you can get the credentials to log in. Go to the file manager and edit the wp-config.php file here you can find the username and password to log in.
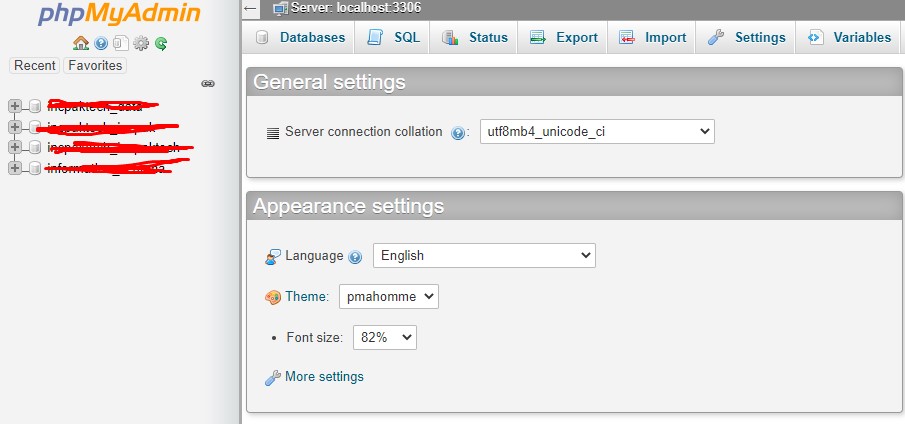
Once you logged into the PHPmyadmin go and find the table wp-options tables.

image 8

And check the home URL and site URL if they are not the same as your site and showing some else like me you have to replace these to your original site. I followed this process to solve the issue for the first time. I found it there and solved it using this process. Maybe in your case, the issue is different and you have to follow this guide to the end.

image 9

Default Theme files Issue

Again on that site after few days this issue happened again. First thing I did was to go back to the database and check the link but, surprise, everything is fine there. Now it’s a big task again to find the issue. I try to access the Admin dashboard of that WordPress site. and happy to know that it’s working. I logged in to the Dashboard and now begin to check other settings for or features, now you want to know-how.

How to check infected files through admin dashboard and resolve

I have the wordfence plugin installed on that site and I scan for intrusions. This scan took a long time to complete but the scan showed some high risk files in the default theme. I proceeded to remove the files from the scan and replaced these files with the default files for the theme. This resolved the issue and it is a solution that worked for me. But maybe in your case both solutions mentioned above do not work in which case go to next steps.

General Settings URL problem:

I found that after solving the problem with the database, as mentioned above, I was able to access the WordPress admin dashboard but after scanning the site using wordfence I was still unable to access the site. After checking the general setting of the website I found the URL of site had also been changed there.

I changed the URL of sites and after that it works. But I must say it is an extreme case. When your security is too low only then it will happen otherwise it is unlikely.

Unknown Problem (Plugins + database + files everything is changed)

I shared my experiences above about the problems that I faced on the site of client and how I solved this. But this is not it. After all these problems I still faced a final problem which took 2 days to resolve. The same client came back to us informing that his site had been hacked again. I wonder why his site had been breached yet again? But the first thing to do is to recover the site back to normal. I start working on his site I go for the database and check link links have again been changed so I use the method above to fix that, then I visited the site it’s still not working with the same redirect issue. Then I will do toward admin dashboard and start a scan, check the general settings and all that but the result is still different from the past. After doing all these I am still not able to get the site operating as normal. Then I decide first to know the reason of hacking site.

How to find the reason of hack:

There are some points that I followed to check site and maybe you cannot find the reason this way. But this is one method that you can try.

First of all I go to the plugins section of the client site and check. I discover that he has a lot of outdated plugins and most of them have available updates. I realise I have found the reason for the continued breach but what to do? how can I find the exact plugin which is insecure, changed or which is helping the hackers to breach the site. Wordfence was also not able to scan these files. May be there are a lot of infected files, too many for wordfence to report? I decide to go for a wpscan from my terminal.

Scan with wpscan

First I installed wpscan on my server and then go for the scan. I found that there are many infected files. His outdated plugins are infected. When I receive a result from terminal I go for those files and replace them with original one I got from the official sites of plugins. Or the files I already have for those plugins.

After the scan I replaced those file but not done with that I also replaced the wordpress file with original files. Let me explain exactly how to do this.

How to replace WordPress files with original files?

This is a tricky point and will be difficult for a beginner. First thing is to find you WordPress version.

Go to the file manager then public_html folder then wp-includes folder. Here you found a file name version.php. Open this file and you can see the version of WordPress that is installed.

Download the WordPress for this specific version from there official site click here to download. Download the version which is installed on your site.

image 7

After downloading upload this to your public_html folder of your site and replace it with your old files.

After doing all these i go to the site and check site is working.

Finally the problem has been resolved and I am happy to share my personal experiences on this with you guys. May be this will be helpful for you in order to solve your problem. Please let me know if you are able to solve your problem in comments. If this article didn’t help or you are unable to understand anything thing ask me.

Read More: HOW TO CHANGE TIMEZONE ON LINUX SERVER

Follow US on Facebook / Twitter  for update.

Wonderful And Creative Uses of PHP

PHP is one of the most popular programming languages that is used for web development. Mostly used for dynamic programming and server development. PHP was originally created by Danish-Canadian Canadian programmer Rasmus Lerdorf in 1994. There are many wonderful and creative uses of PHP for its users.

Php Stand for Hypertext Preprocessor. In this article, we will discuss some wonderfully uses of PHP That make your site more useful.

Table Of Contents:

  1. WordPress Theme Development
  2. Image Processing And Generations
  3. Content Management Systems
  4. Server-Side Backend Code
  5. Write Your Own Script Code
  6. WordPress plugin development
  7. Integrate AMP
  8. E-commerce Development
  9. Cyber Security and Authentication
  10. Real Time Applications

WordPress Theme Development

Uses of PHP

WordPress is a free and open-source CMS written in PHP. WordPress is one of the most used CMS. Over 1.3 billion websites are using WordPress. This popular CMS use themes and plugins to manage the users’ data.

With the popularity of WordPress Demand for WordPress themes also increased. There are a large number of WordPress themes on different platform of WordPress like Theme Forest.

PHP plays an important role in the development of the WordPress theme. All files with .php extension in WordPress theme code are PHP code files.

WordPress theme development do not need any expert level PHP understanding you can start with a basic knowledge.

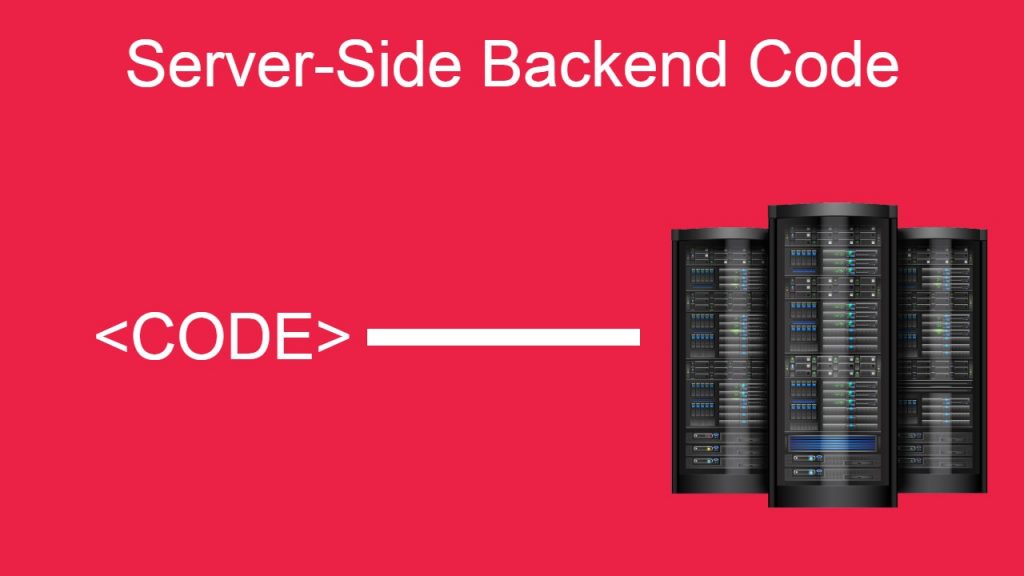
Server-Side Backend Code

Server-Side Backend Code

Web development is often divided into two parts like front-end and back-end. Front end is basically the users interface. What a user can see.

Basically front end is practice to convert the data in visuals. Using different programming languages and techniques. Like HTML, CSS, JavaScript, React, Angular etc.

Backed is the part which is not accessible for the user, typically responsible for storing and manipulating data. But it enable a website to function properly.

There are many tools, techniques and languages that are use to develop server side back-end.

PHP is one of the most popular among them. PHP is used to develop and build server-side back-end systems. PHP performs very well in back-end techniques and processing.

Content Management Systems

Content Management Systems

A content management system is a system that is used to manage digital content, allowing multiple contributors to create, edit and publish.

PHP is the most popular platform to create CMS. There are many CMS built using PHP. Like WordPress, Drupal, etc. There are many online resources with them you can start building CMS from scratch.

WordPress plugin development

WordPress plugin development

If you are working with WordPress you must know about the WordPress Plugins. There are large number of WordPress plugins present in WordPress plugin repository and on plugins site. These plugins are free and pro versions.

Like theme development if you have basic knowledge of PHP you can develop plugins.

There are verity of WordPress plugins like plugins for Woocomerace, Page builders, Cache Plugins, etc.

Image Processing And Generations

Image Processing And Generations

There is a library called GD. Using this library with PHP, you can output images in different file types like jpeg, png and gif. This feature is very useful. You can create thumbnails, crop pictures, resize pictures, and if you want to create a photo gallery you can do it.

You can create different formats of images with just few lines of code.This thing is very useful and helpful for front-end.

Write Your Own Script Code

Write Your Own Script Code

PHP scripts are usually use for back-end. But you can use script for other cases too like make a script for email list. you can send a notification by using PHP script. These are some wonderful uses of PHP scripts.

You can also run PHP scripts using command line interface (CLI).

Integrate AMP

Integrate AMP

Accelerated Mobile Pages (AMP) is basically use to optimized for mobile web browsing and intended to load web pages faster. AMP reduce website load time on mobile.

In this Amazing technique PHP helps to improve the loading speed. And this load speed helps site to improve ranking. It also effects the SEO.

E-commerce Development

E-commerce Development

One of the most important role of PHP is its use in e-commerce. Design and develop a e-commerce website from scratch is very tough and time-taking process. Even integration of an existing e-commerce system with new system is also a tough process.

But if you are an expert of PHP you can easily find a solution for this problem, Creating from scratch or integrating existing one.

There are many existing PHP Frameworks for e-commerce. By using that you can easily done your work. There is no need to write code from scratch instead use a PHP framework.

PHP frameworks such as Cake PHP, Symphony, Laravel, Code-igniter are of great help to developers.

Cyber Security and Authentication

Cyber Security and Authentication

Now the most important thing for any site is its security. According to a survey On average 30,000 new websites are hacked every day. An other report say that “Above 60% companies faced web-based attacks”.

Hacker are always try to find some way to hack any site and get data access. PHP is very useful for this. it is a great language that helps you to combine cyber security on your website.

The setup of Cyber security mechanism with PHP development tools helps to prevent ongoing frequent cyber attacks.

User authentication is one of the most important aspect of web security. Almost every site need to implement user authentication. there are a large number of techniques which are used for the implementation of user authentication.

Using PHP for this propose is very common and preferred way. PHP can easily store and retrieve username and password pairs on a database, using top-level encryption. You can also use different encryption techniques.

Real Time Applications

Real Time Applications

Now there are huge amount of real time applications. We can see the real time web application like chat, web games, monitoring systems, social media applications, networks, etc.

Developers develop real-time applications using different tools, techniques and technologies, Like React js, HTML, Node js, Angular, Express, CSS, and others.

PHP is also one of the most used platform in real time application. Some very popular real time application are developed in PHP.

Basically PHP is used to develop back end for real time applications. Now a days Node js is one of the popular technology for back-end but in some case it can not useful as PHP is.

Read More: HOW TO CHANGE TIMEZONE ON LINUX SERVER

Follow US on Facebook / Twitter  for update.

How to Setup CyberPanel on AWS EC2

If you want to setup CyberPanel on AWS EC2, read the article and follow the steps to do so. We will go from signing up on Amazon AWS to setting up an instance and installing CyberPanel

After reading this article you can easily set up an EC2 instance with Cantos 8 and install CyberPenel on it. Follow all the steps mentioned below.

Table Of Contents:

  1. AWS Access and Basics
  2. Create an EC2 instance on AWS
  3. EC2 Setup with Centos 8 minimal
  4. Ports Configuration (Firewall Configurations)
  5. Access Key Setup
  6. Access server using Bitvise
  7. Install CyberPanel

AWS Access and Basics:

To Set up an EC2 instance and install CyberPanel on AWS. First of all, you need an AWS account to do this. If you already have an AWS account. Log in using this link. And provide the required information.

image 35

If you do not have an account, go to this link. And provide the required information.

image 34

Amazon Web Services is a platform by Amazon that provides Web services globally.

Create an EC2 instance on AWS:

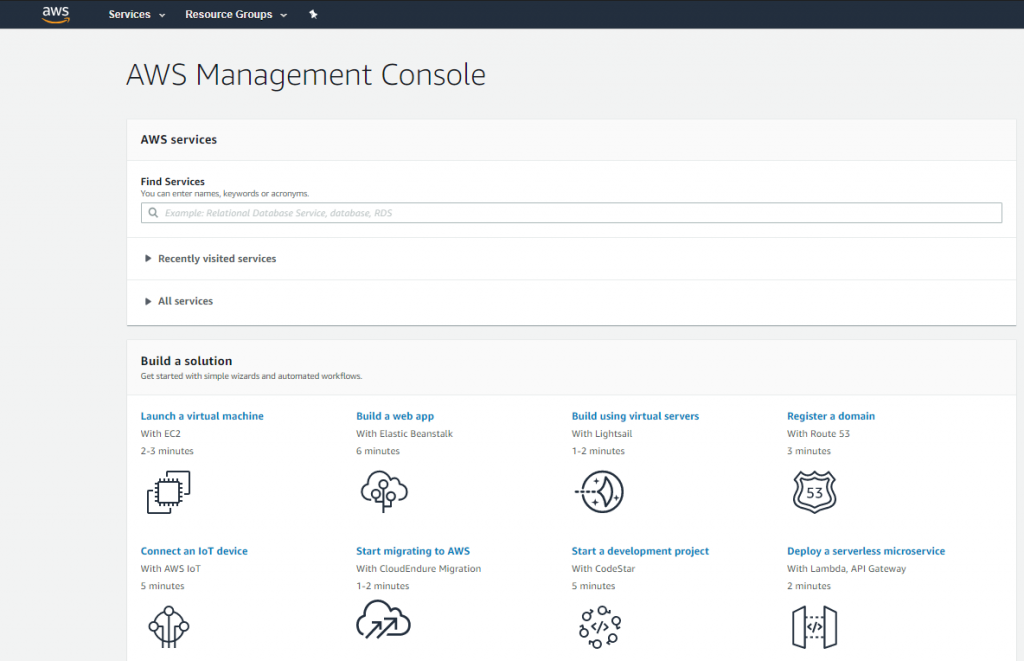
You can see this dashboard when you access the AWS console.

Setup CyberPanel on AWS EC2

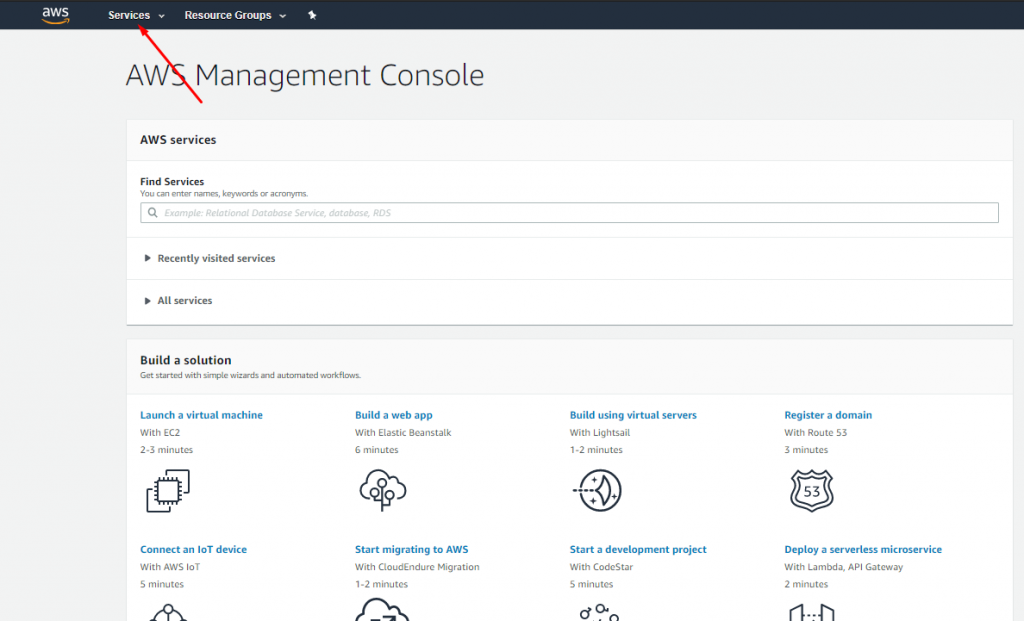
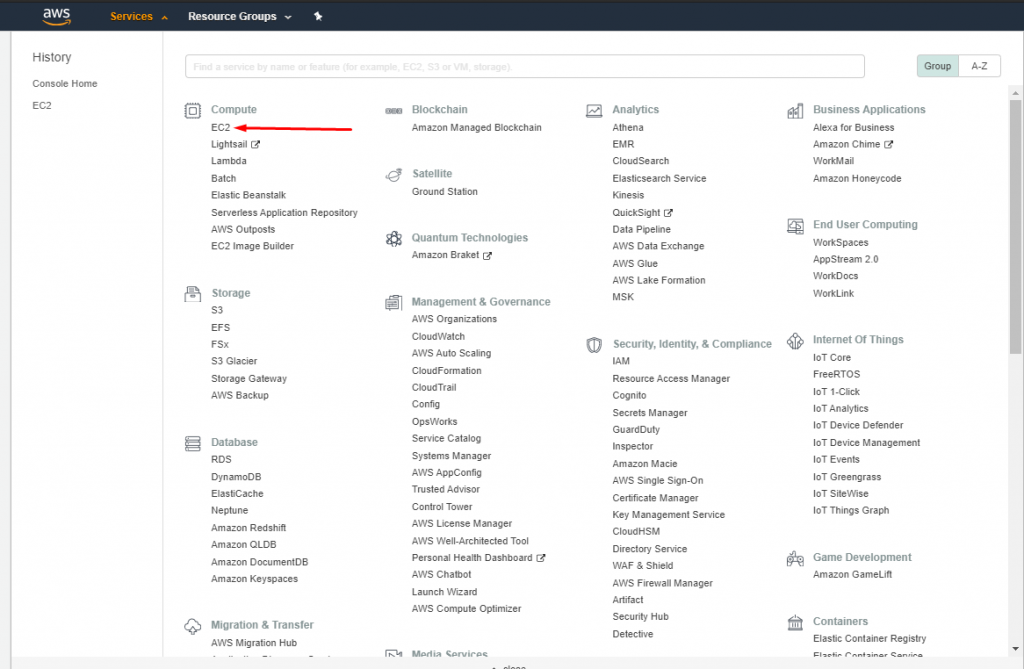
Go to the Services option on the top menu.

image 37

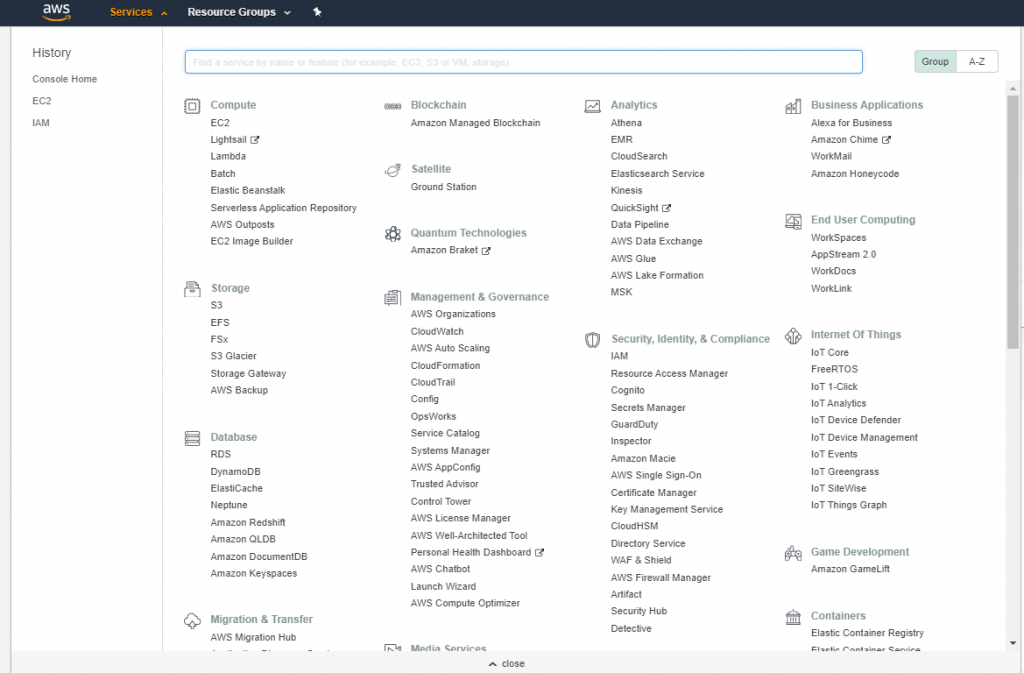
Click on the Services and you can see this screen.

image 38

EC2 Setup with Centos 8 minimal

You can see the EC2 option on you screen click to start the process.

image 39

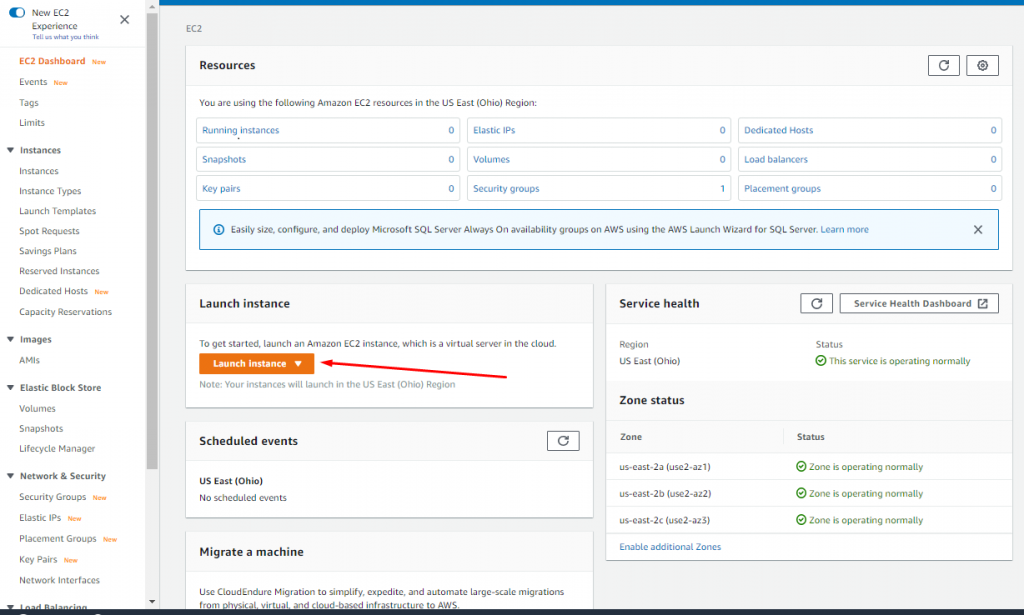
Once you click on the EC2 option now this screen appear.

From here you can create an EC2 instance with Centos 8 as OS. You have to click on the Launch Now option and proceed to the next steps.

image 40

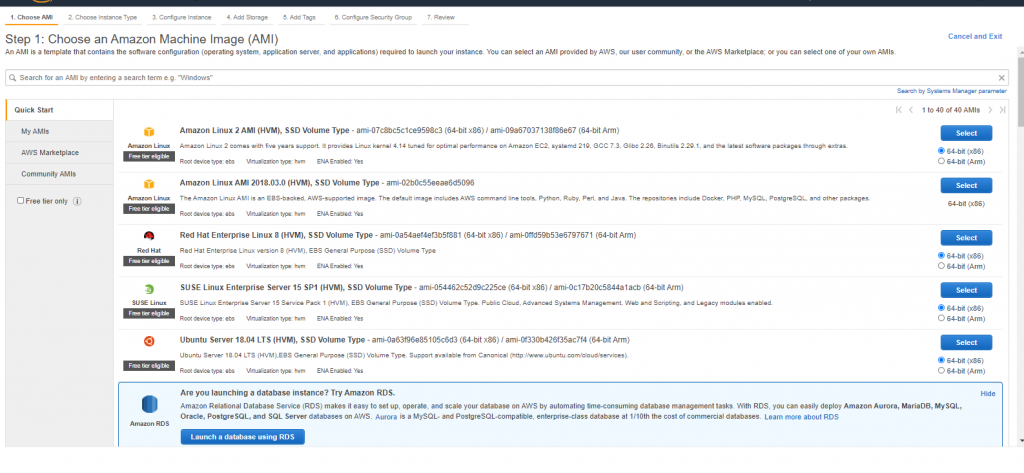
1.1.  Choose AMI

Choose an Amazon Machine Image (AMI). Here you have to select the operating system image that will be used in this Instance.

image 41

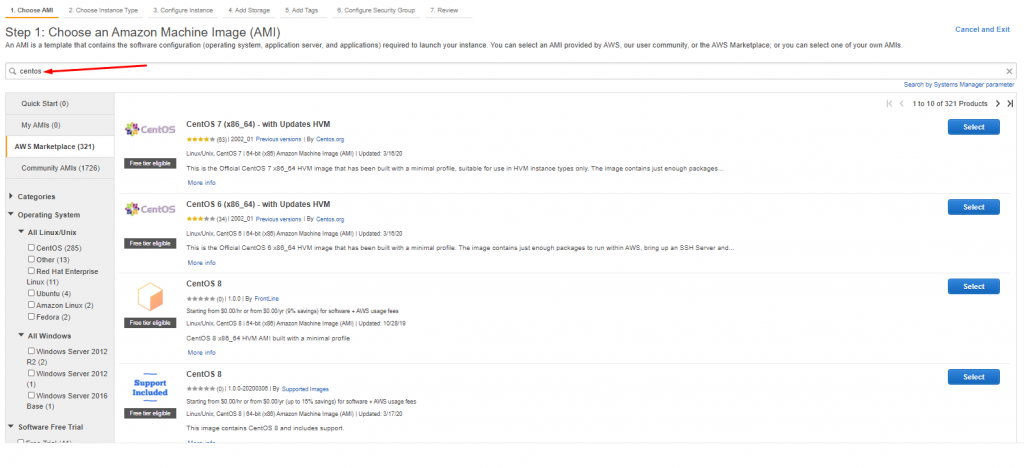
On the screen above you have to go on the AWS Marketplace Option.

Here you have to search for Centos. (You can also go for any operating system you want to install but make sure it is supported by CyberPanel).

image 43

From the different versions of Centos, we go for the CentOS 8 Minimal (CentOS 8.2.2004).

Click on Select button to proceed with the instance set up.

image 44

After selecting the operating system you can see a Pricing Page. Click Continue to processed (this is just a description of how much you will be charged depending upon the instance size you choose on next screen)

image 45

1.2. Choose Instance Type:

In this step, you have to choose the instance size of your choice. And click for the next step. I choose a general that has a free trial.

image 47

1.3. Configure Instance

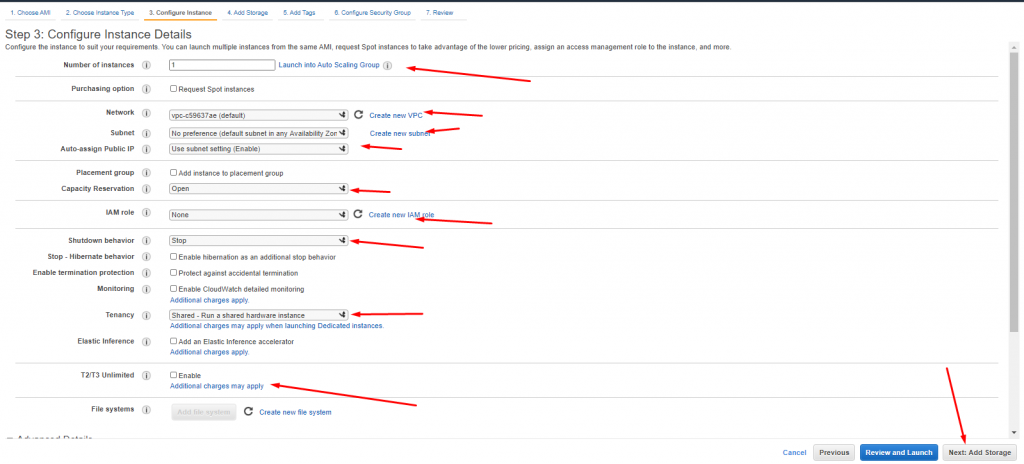
In this step leave the settings as default if you want to change anything go according to your requirement. If you don’t want to change anything then leave this as default and processed to next.

image 49

1.4. Add Storage

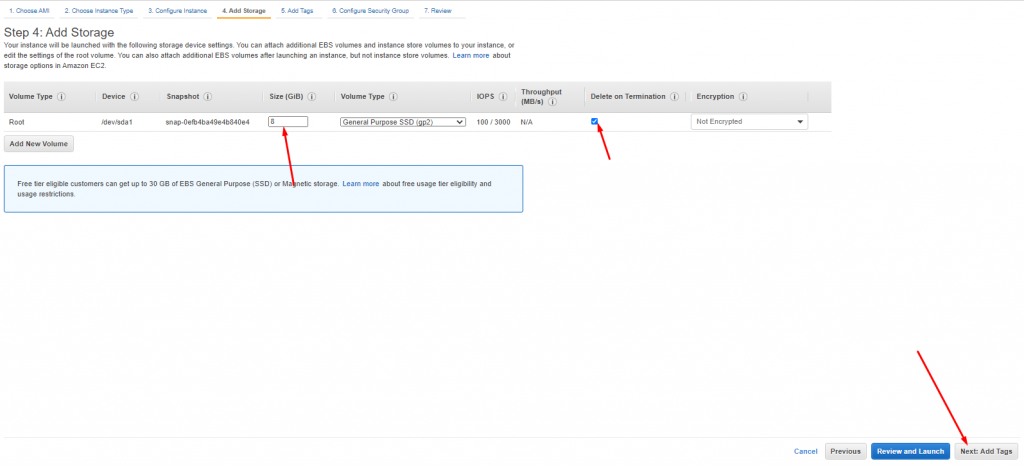
Add or change the storage according to your requirement. Processed to the next after changes.

image 50

1.5. Add Tags

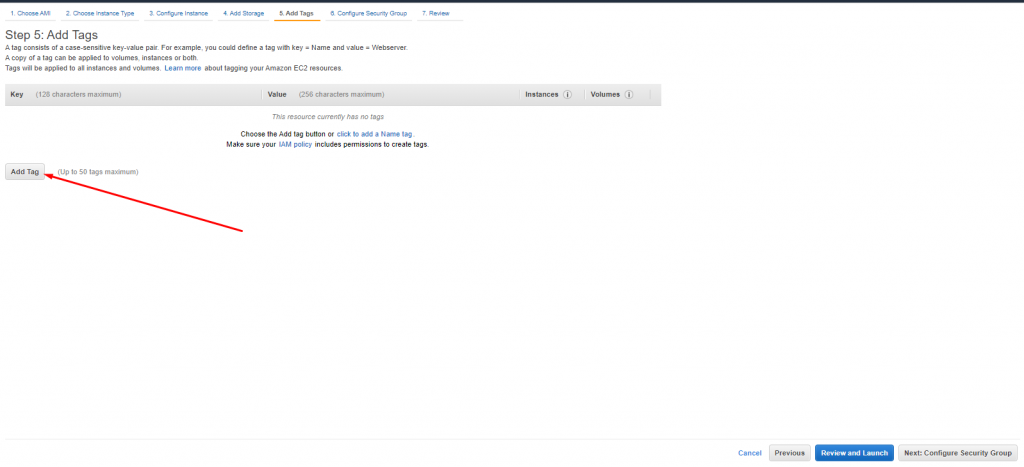
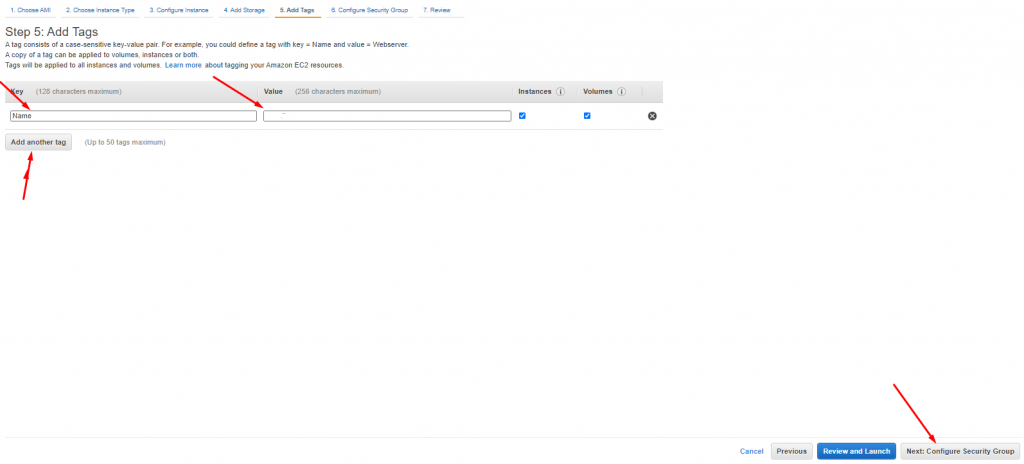
Add any tags you want to add in this step. Like name, title etc.

image 51

Add the information like this:

image 52

After this processed to next.

1.6. Configure Security Group

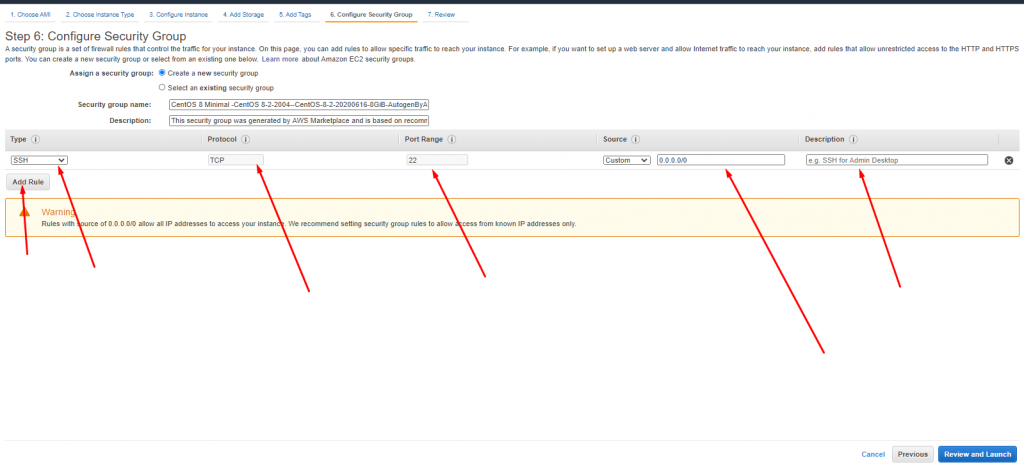
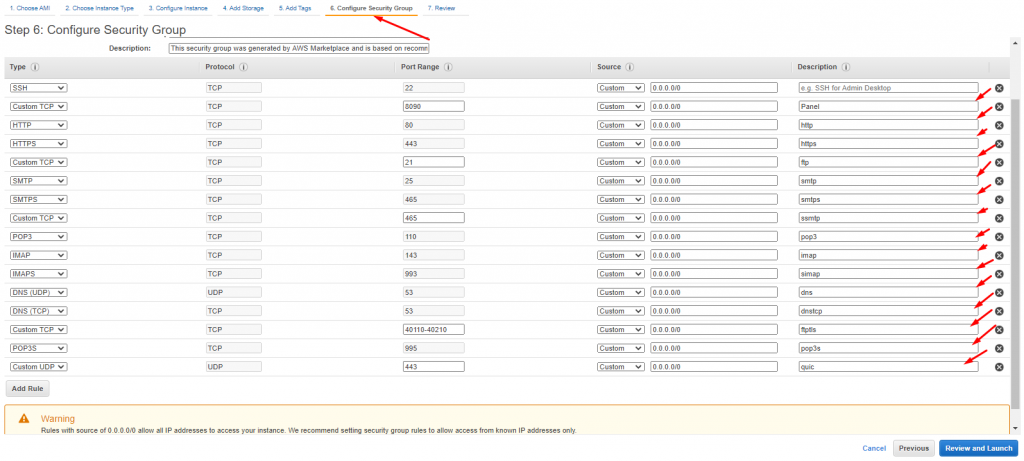
This is the most important part of this process. You must have to add all CyberPanel ports before actually installing CyberPanel otherwise some features of CyberPanel may not work.

There is only one port in default configuration which looks like:

image 53

Add all the ports as seen in the picture below

image 54

Add IP as 0.0.0.0/0, ::/0

Ports that are needed to open for CyberPanel to work properly (In IP Address section you may want to replace 0.0.0.0/0 with your IP for some services like SSH to better protect your server against attacks):

IDNameProtocolIP AddressPort
1paneltcp0.0.0.0/08090
2httptcp0.0.0.0/080
3httpstcp0.0.0.0/0443
4ftptcp0.0.0.0/021
5smtptcp0.0.0.0/025
6smtpstcp0.0.0.0/0587
7ssmtptcp0.0.0.0/0465
8pop3tcp0.0.0.0/0110
9imaptcp0.0.0.0/0143
10simaptcp0.0.0.0/0993
11dnsudp0.0.0.0/053
12dnstcptcp0.0.0.0/053
13ftptlstcp0.0.0.0/040110-40210
14POP3Stcp0.0.0.0/0995
15quicudp0.0.0.0/0443
16terminaltcp0.0.0.0/05678
17lswstcp0.0.0.0/07080

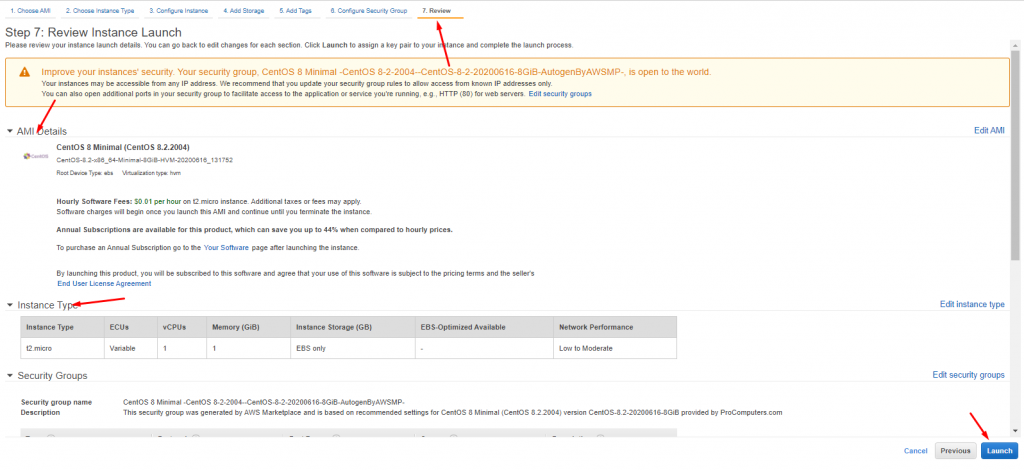
1.7. Review

In the last step of the EC2 setup review all the information you added before in the previous steps.

image 55

Access Key Setup:

Once set up is completed you have to create a key pair to access server otherwise you can not enter SSH to install CyberPanel. You can upload an existing key as well but we will create and download new key.

image 56

Download this Key Pair in your local computer, so that we can use it later to access this instance.

Use this key and Launch this instance.

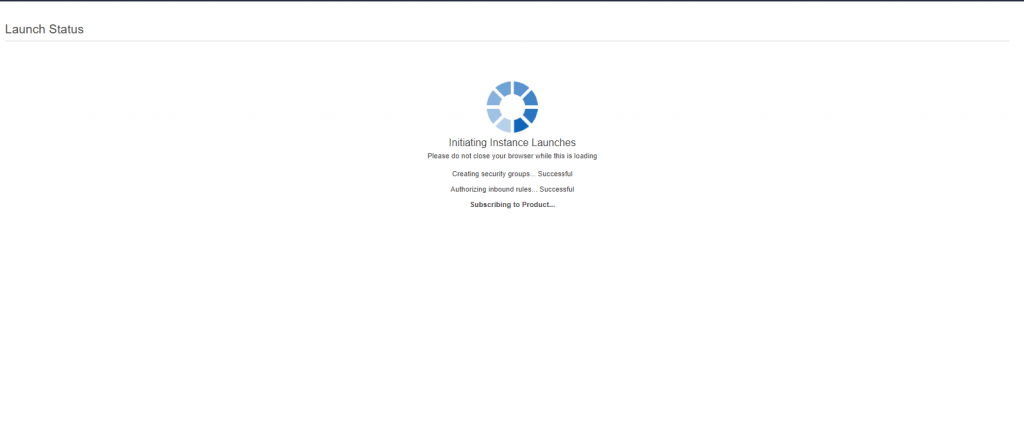
image 57

You can see the Amazon EC2 will not set-up your instance in few seconds and it will be ready to use.

image 58

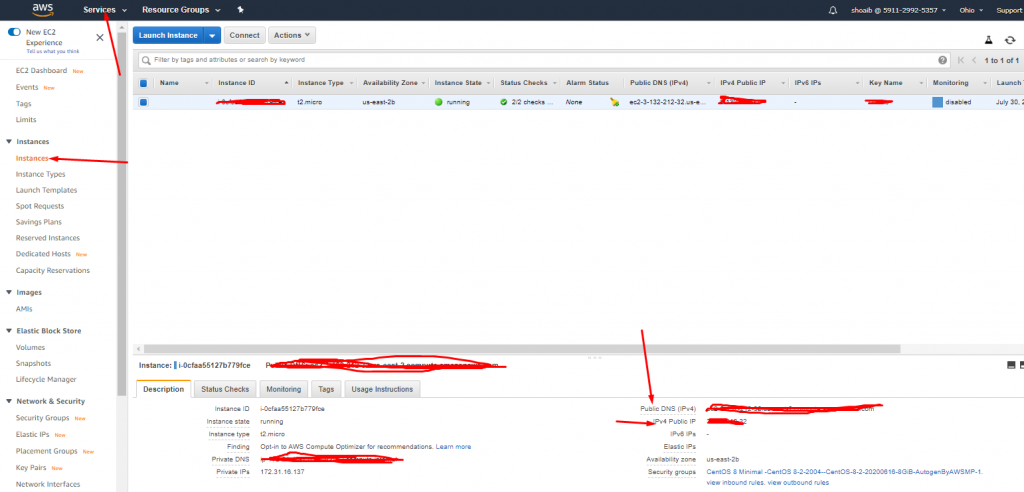
After completion of this process, you can check your instances through. Services-> EC2 -> Instances here you can see all information.

image 59

Access server using Bitvise:

Once all is done for the EC2 setup. Its time to access the server and install CyberPanel. You can access your server using different tools but for this article, we will use Bitvise. If you don’t have Bitvise installed on your computer download it from here.

After downloading provide your IP address for Host field, Username will be centos(Default username is centos). Port 22. Set the initial methods to a public key and client key to auto.

image 60

To grant the access to your key click on the Client key manager. and on the next screen click on the import option.

image 61

Select you key file and i will appear on the Client Key Manager.

image 62

After all, click on the login button to get server access.

Install CyberPanel:

Once terminal was launched.

Follow this guide to install CyberPanel.

Read More: HOW TO CHANGE TIMEZONE ON LINUX SERVER

Follow US on Facebook / Twitter  for update.

How CyberHosting Affiliate Program works

In CyberHosting Affiliate Program we have Multiple commissions models that make sure your hard work is rewarded at its best.

Table Of Contents:

  1. How to Register For Our Affiliate Program.
  2. Get details about Program
  3. Benefits Of Affiliate Program

How to Register For Our Affiliate Program:

If you have not yet signed up for our Affiliate Program and would like to sign up for the Cyber ​​Hosting Affiliate Program. Follow these steps:

Reach Affiliate Program Page:

The first step is to reach the Cyber Hosting official site. Click Here to do so.

image 28

After reaching the site. Go to the Affiliate option. Present in the Top menu.

image 29

This Affiliate link shows two options, How it works and Affiliate Area.

Register For Affiliate Program:

If you have not yet signed up for our Affiliate Program click on the Affiliate Area Option in the Affiliate Menu.

CyberHosting Affiliate Program

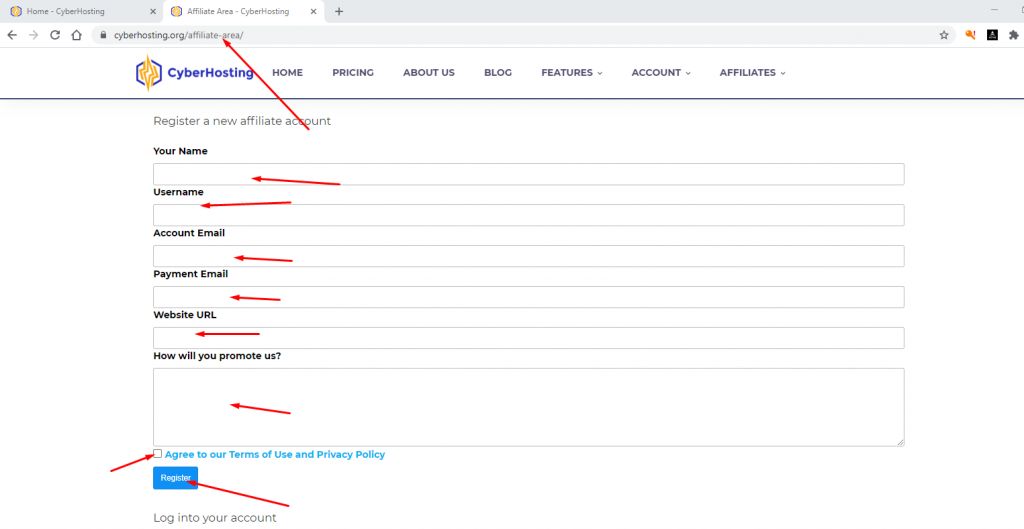
Go to the Affiliate Area Page. If you have not yet registered, you can view this form at the bottom of the Affiliate Area page

image 31

Provide All information that is required for registration. And click the Register Button. You will receive a Massage for approval pending state.

image 32

Get Affiliate URL:

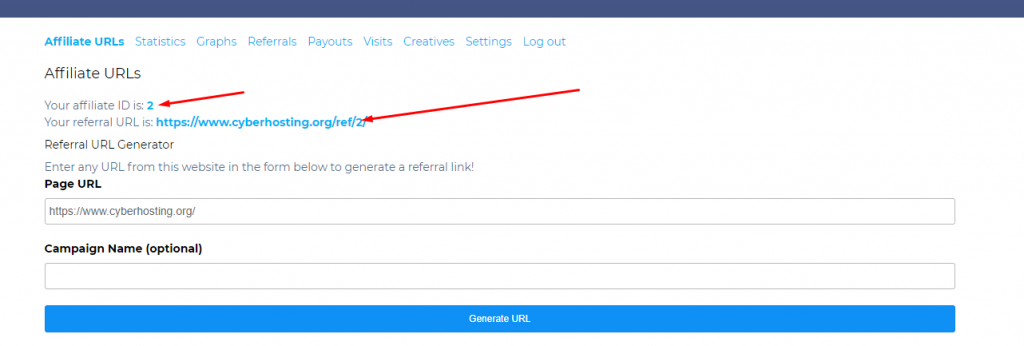
Once Your Approval has been Approved from CyberHosting You Will get an email and you can get you Affiliate Program link by sign-in on the affiliate page.

image 33

Get details about Program:

If You want to get any details About CyberHosting Affiliate Program. Click Here.

If you want to know about our Product prices Click Here.

Benefits Of Affiliate Program:

  1. $25 signup bonus (when the referred client makes a purchase).
  2. 7% recurring lifetime commission from all referred customer invoices.

Follow US on Facebook / Twitter  for update.

How to transfer a website from cPanel to CyberPanel manually

cPanel is one of the most papular web hosting control panel, which helps to manage websites. CyberPanel is an emerging web hosting control panel also use to manage websites. In this article, we will discuss how you can transfer a website from cPanel to CyberPanel manually. This is very important to know if you want to move your site from cPanel to CyberPanel.

CyberPanel also has a one-click importer. Use our guide if for some reason one-click importer fails to import your site (which happens rarely in case your database is very large)


Table of Contents

  1. Download Files from cPanel
  2. Export Database from cPanel
  3. Create a website in CyberPanel
  4. Upload Files on CyberPanel
  5. Create a Database in CyberPanel
  6. Change DNS
  7. Alternative Transfer Method

Transfer a website from cPanel to CyberPanel

1. Download Files from cPanel:

Here are some steps to download files from cPanel:

1.1 Login to cPanel:

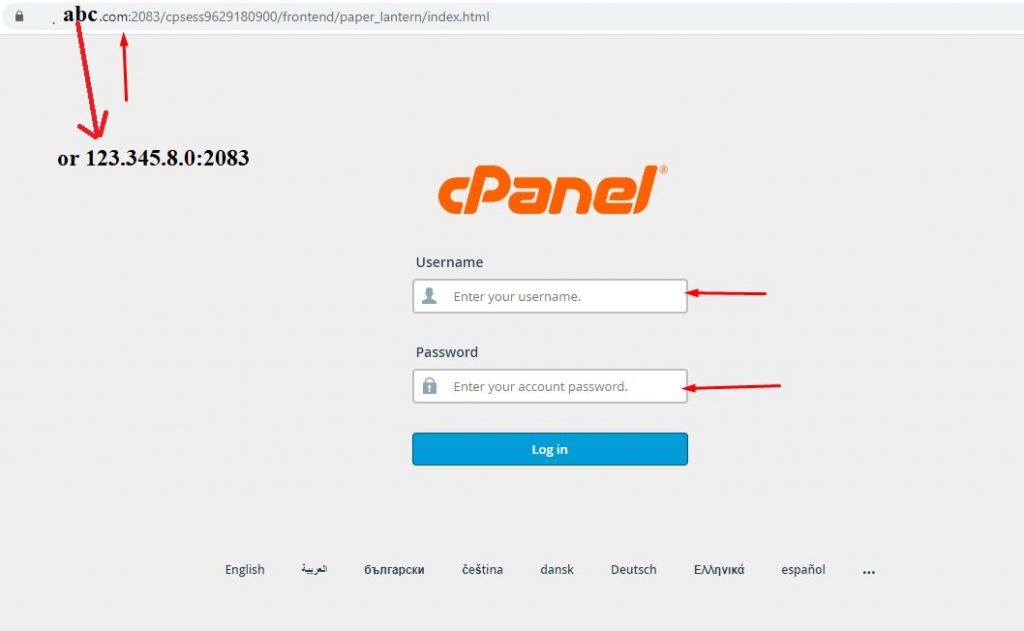
The first step in moving/tranfering a site from cPanel to CyberPanel is to log in to your cPanel account using your credentials. Login to cPanel is required for next steps.

Go to your site cPanel address

cPanel LogIn

1.2 Compress Files in cPanel:

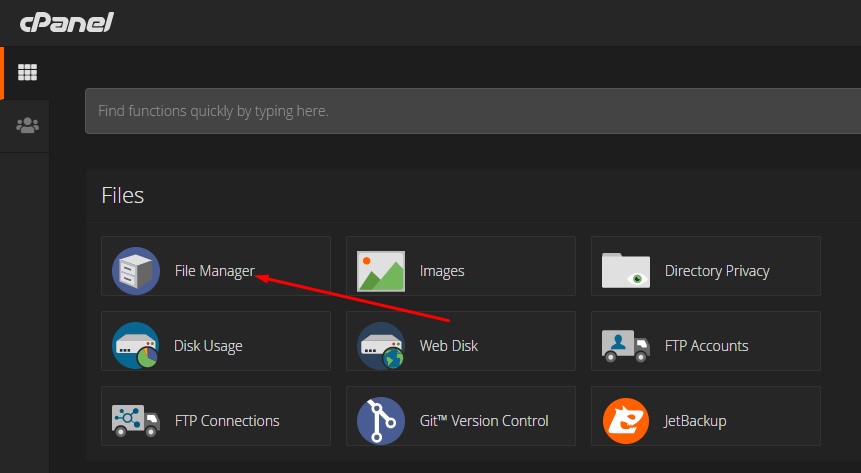
After logging in, go to the cPanel File Manager option in the cPanel dashboard.

File Manager cPanel

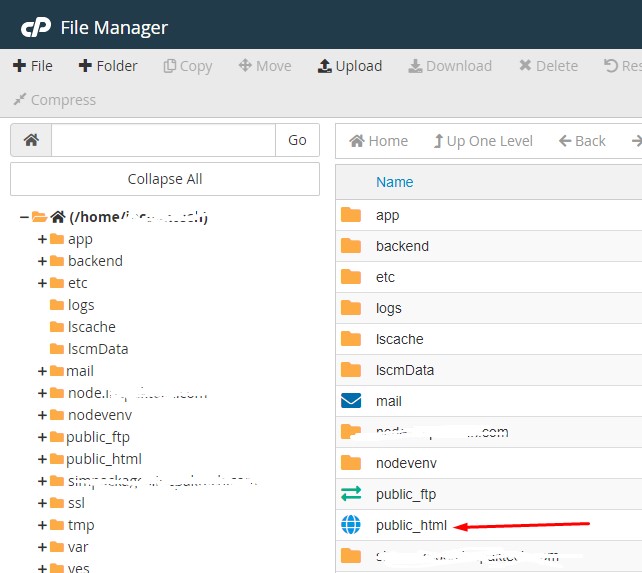
Open the file manager, then select the public_html folder and open it.

Public html floder

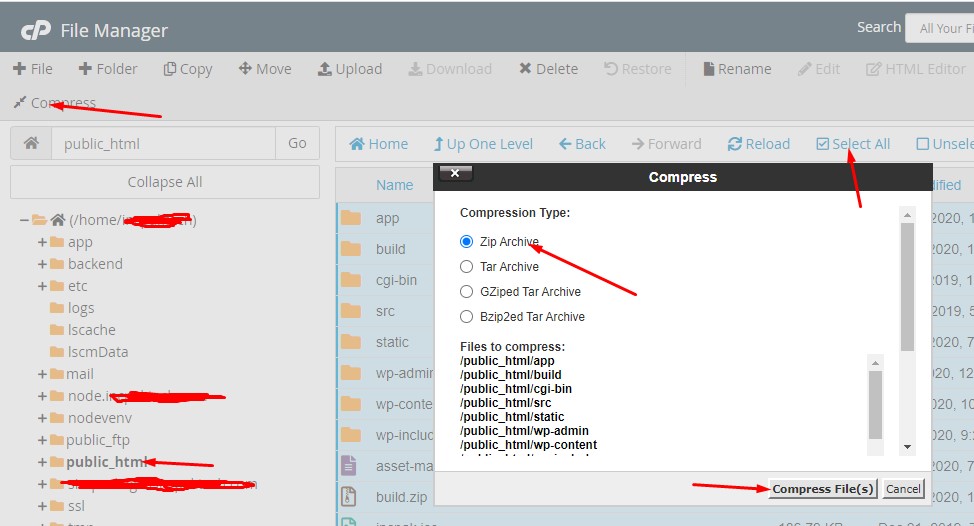
Select and compress all the files present in Public_html folder.

compressed files in public html

1.3 Download the compressed file

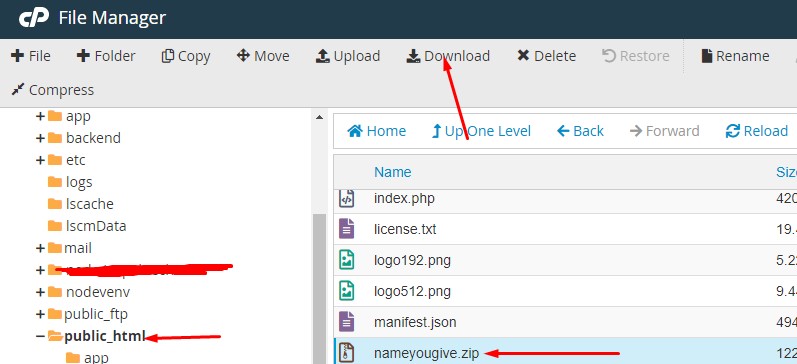
A compressed file is present in the public_html once compression is completed. Select this file, and download it on your local computer. If the file is large and you have a slow internet connection we’ve mentioned a few ways in step 7 as to how you can easily transfer this file without locally downloading the file.

download compressed file

2. Export Database from cPanel:

A database is the most important part of any site. Each site relies on its own database for internal links, responses, and other features.

To import Database from cPanel follow these steps:

Log in to the system using the credentials described in the last step.


2.1 Open PHPMYAdmin:

Check PHPMyadmin Option in the cPanel Dashboard and open it.

PhpAdmin on cPanel

Once you click on the PHPMyAdmin option. A dashboard will open from where you can select and export your database.

phpmyadmin dashboard

2.2 Export Data Base:

Once you are in the PHPMyAdmin Dashboard, select the database related to your website and click on the Export option.

exporting database

Note: Select the file type zip or MySQL when you want to export.

The exported database will save a compressed database file to your local computer.


3. Create a Website on CyberPanel:

Here are the steps to create a website on CyberPanel:

3.1 Login to CyberPanel:

Like cPanel, you must first access your CyberPanel using your credentials to log in. To do this, look at the URL of your CyberPanel. It displays a screen for logging in. Provide the required username and password and access the dashboard.

Cyber Panel Login

3.2 Create a Website:

After logging in, click on the Website -> Create option on the left menu or on the dashboard of CyberPanel. Then provide the information to create the site. Provide the exact URL of the site when you are creating the site.

Create website in cyberpanel

4. Upload content on CyberPanel

Once you have completed the website creation process. Now it’s time to upload the content that is exported from the cPanel. Basically the compressed file you got from the File manager -> Public_html in cPanel.

4.1 Mange Website:

Go to the Website -> List Websites. Here you can see a website that you have already created. On the right side of this website, you can see a manage button. Click on it to open the Website Management Dashboard.

Manage Websites

4.2 Upload and Extract Content:

Once you get the website Management Dashboard.

Check the file manager option on the website manager dashboard.

file manager

Open the file manager and here you will find the public HTML folder. Open this folder.

public html

Upload that compressed file download from cPanel to your computer.

Upload record

Once the file is uploaded, extract the file to retrieve content from it.

extract file

5. Create a Database in CyberPanel:

After uploading content. It is important to create a database that solves content issues.

5.1 Create Your data base:

Click The Database button on Dashboard or in the left Menu:

image 4

In next Step Click On create database option:

image 5

Select the domain you added in last Step.

image 6

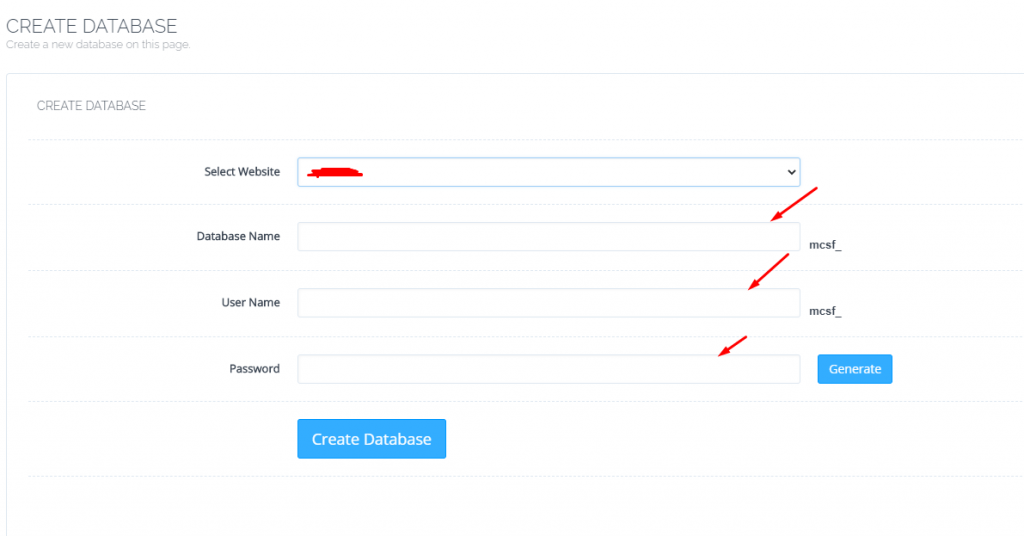
Provide the required information and click on Create Database button.

image 7

5.2 Login to PHPMyadmin:

Get access to PHPmyadmin goto Databases -> phpMyadmin in CyberPanel Dashboard.

image 8

Provide the credentials that are required to access.

login phpmyadmin

5.3 Import DataBase to CyberPanel:

After creating the database. Go to Import Option, then select the file that is exported database file from cPanel. Click the Go button at the bottom right of the page.

Transfer a website from cPanel to CyberPanel

6. Change DNS

If you are using the cPanel DNS then follow this tutorial link below

If you are using any other DNS provider, then go to the DNS provider platform and change the IP of cPanel with the IP address of CyberPanel. In the DNS section, there is a record section replace old IP with new IP. Replace the both with @ and without.


 7. Alternative Transfer Method

In the case of large data on cPanel, you can use an alternative method of migrating websites from cPanel to CyberPanel.

7.1 Transfer Using wget:

  1. Compressed the data present in the Public HTML folder of cPanel.
  2. Get the address of that compressed data on cPanel.
  3. And Download or get the data on the CyberPanel server by using wget Command.
 $ wget <cpanle-file-address>

7.2 Transfer Using rsync:

By using rsync command you can copy and synchronize your data remotely and locally. You can copy or synchronize data from server to server.

  1.  Install rsync on your Linux server by using following commands
$ yum install rsync (On Red Hat based systems) like: Centos 
$ apt-get install rsync (On Debian based systems) like: Ubuntu

7.3 Basic Syntax

$ rsync options source destination

7.4 Copy/Sync Files and Directory to or From a Server

$ rsync [-options] [email protected]:SOURCE DESTINATION

Note: Use these alternative if you have large amount of data to transfer.

Read More: HOW TO CHANGE TIMEZONE ON LINUX SERVER

Follow US on Facebook / Twitter  for update.

How to optimize WordPress site using LSCache Plugin

Learn from Niel Patel as to why slow speed is a killer for your online business and let see how you can easily speed up your website.

WordPress is a free Content Management System (CMS) used by more than 60 million websites, WordPress is one of the most popular CMS solutions. Considering the popularity of this CMS, optimizing WordPress sites to load quickly is very important and sometimes it is difficult. PageSpeed of any website is one of the major factors for both usability and SEO. In this article, we will discuss how you can improve the loading speed of your WordPress site using LSCache Plugin.


Table of Contents

  1. What is PageSpeed or Page Optimization?
  2. Factors that affect the PageSpeed of a WordPress site.
  3. How to improve PageSpeed.
  4. How to check PageSpeed.
  5. Benefits of PageSpeed.

1. What is PageSpeed or Page Optimization?

Basically PageSpeed means that how quickly a web page load when a visitor clicks on the link or types in the URL. Usually, a visitor expects that their pages load quickly and this imparts a good first impression on them. PageSpeed not only creates a good impression but also improve search ranking as it affects the SEO


2. Factors that affect the PageSpeed of a WordPress site:

  1. Un-optimized media (Large-sized images and videos)
  2. Un-used CSS and JS
  3. Un-Minified CSS and JS
  4. Excessive Use of Plugins and Widgets (In-active and unnecessary plugins)
  5. WordPress Theme (Theme Choice is important)
  6. Poor Choice of Hosting Service.

3. How to improve PageSpeed:

Follow the steps mentioned below to improve overall speed of your WordPress site.

3.1 Optimize or Reduce media size:

Use of Images and videos make the content more beautiful and attractive but a common mistake is to upload pictures and video directly without any optimization. Always optimize media like videos and images before uploading it on site for use. Use the latest jpg/jpeg version only, PNGs should only be used when transparency is needed. Lower images result in smaller page sizes hence a boost to Pagespeed.

For the images that have been uploaded already, you can also use WordPress plugins for image optimization.

Most Common Image Optimization Plugins:

  1. LiteSpeed Cache
  2. Imagify
  3. Optimole
  4. ShortPixel Image Optimizer

There are many image optimization plugins on WordPress plugins directory, let see how we can use LiteSpeed Cache plugin to optimize images:

  1. Click on LiteSpeed Cache -> Image Optimization. 
  2. Click on Send for Optimization button until all the images are optimized
  3. Once optimization is completed click on Gather image Data.
  4. Check the Image information section on the right side, it shows the optimization status. Green ticks suggest complete optimization.
Image Optimization
  1. Go on the Image Optimization Settings Option on screen.
  2. Check all the options as shown in the picture.
Image Optimization

3.2 Minify HTML, CSS and JS Files:

Minification of HTML, CSS, and JS files are some of the most common and important steps to increase page speed.  Google PageSpeed Insights and/or any other page speed tool always recommends this.

This issue happens due to the white spaces and extra CSS and JS  on the website page.

You can fix these issues manually or use a WordPress plugin to do so. Some plugins are listed below.

  1. LiteSpeed Cache
  2. Autoptimize
  3. JCH Optimize

Minify CSS and JS using LiteSpeed Cache:

  1. Click on LiteSpeed Cache -> Page Optimization -> JS Settings
  2. Change your settings according to the image below
  3. Follow this guide in case this setting breaks any functionality or visual structure of your site
Js Optimization
  1. Click on LiteSpeed Cache -> Page Optimization -> CSS Settings
  2. Change your settings according to the image below
  3. Follow this guide in case this setting breaks any functionality or visual structure of your site
CSS Setings

3.3 Excessive Use of Plugins and Widgets:

Excessive use of Plugins and Widgets can also slow down your PageSpeed. Always take care of extra and unnecessary Plugins and Widgets. Uninstall all in-active and unused plugins from sites. Never add any unused widgets.

Delete extra/inactive Plugins

  1. Click on Plugins->Installed plugins -> InActive
  2. Click on the Delete option right below the plugin name
Uninstall Plugin

3.4 Theme Choice:

The choice of theme to run the site is very important. Always choose a lite-weight theme for your site. Unlicensed/nulled themes slow down PageSpeed of your site so always use a licensed theme for the site.


3.5 Choice of Hosting service:

Hosting service is one of the main reasons behind the low PageSpeed. To run a  site on a shared server may be good from a financial point of view but it usually fails to deliver good loading times on peak traffic hours. So always use a good web hosting provider for your site to achieve a better PageSpeed, SEO, and traffic.


4. How to Check PageSpeed:

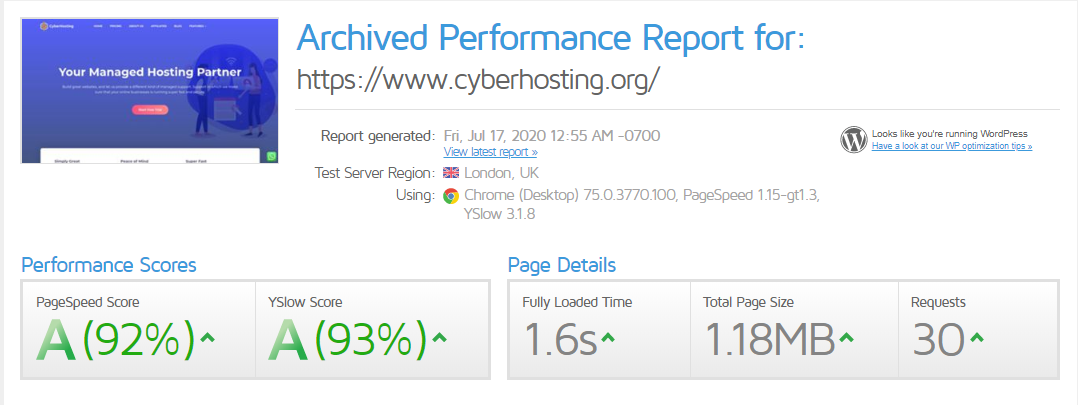
There are many ways to check the page speed of any site. A lot of sites are there to check the Page Speed of any site. Google also offers a tool called Google PageSpeed Insights for this.

Some sites that can help you to check various factors affecting your PageSpeed:

How to optimize WordPress site using LSCache Plugin

5. Benefits of high PageSpeed:

  1. PageSpeed improves search engine rankings
  2. It is important for SEO
  3. It ensures a good first impression on the visitor
  4. Also, help to decrease the Bounce Rate so visitors love to navigate between pages

Read More: HOW TO CHANGE TIMEZONE ON LINUX SERVER

Follow US on Facebook / Twitter  for updates.

How to set custom/extra headers for OpenLiteSpeed while using CyberPanel

Custom/Extra Header can be used for many proposes like:

  1. Content Security policy
  2. Referrer policy
  3. HSTS (Strict-Transport-Security)
  4. Content-type options

If you are using the LiteSpeed Enterprise server you can add Extra headers to your htaccess file and the server will add it automatically just like you used to do with Apache as it is fully Apache Compatible.

However, if you are using OpenLiteSpeed it has to be done via OpenLiteSpeed WebAdmin or by adding it to vHost configuration for the website via CyberPanel.


Table of Contents

  1. Log in to CyberPanel
  2. Open the website Manager
  3. vHost Configuration
  4. Verify Headers.

Here are the steps to add a custom or extra header via vHost configuration from CyberPanel.


1. Log in to your CyberPanel Server

Visit https://<IP Address->:8090

Enter credentials to log in.


2. Open the website manager:

     2.1 Click on the website and then click on the list websites.

Click on website and then click on list websites

      2.2 Click on the manage button in front of your desired website.

Click on mange button in front of your desired website.


3. vHost Configuration :


      3.1 Click the vHost conf from the website manager.

Click the vHost conf from the configurations portion in website manager.

      3.2 Find the block name “context” if it is found add extraHeaders value in it like “extraHeaders Access-Control-Allow-Origin *”.

      3.3 If “context ” block not found in vhost conf file Add the following before the rewrite { } portion.

context / {

extraHeaders Access-Control-Allow-Origin *

}

extraHeader

You can add the value of extraHeaders according to your requirement. 


4. How to verify extraHeaders configuration:

To verify extraHeaders configuration follow the steps:

    4.1 Open Network tab:

        1. Vist your website in any browser and open developer tools.

        2. In developer tools click on Networks tab

Open network tab

         3. Click on the file with your domain name. like(abc.xyz)

Screenshot 9

         4. Go to Network Tab and check headers for any request. You should the extra header you added in vHost conf.

Verify vhost configuration


How to set HSTS (Strict-Transport-Security) in custom the header:

HSTS is a web security policy mechanism that helps to protect websites against man-in-the-middle attacks such as protocol downgrade attacks and cookie hijacking.

To set HSTS in custom Header follow the steps:

             => Follow the 1,2 and 3 steps stated above to open the vHost conf file.

             => Add the following before the rewrite { } portion.

context / {

extraHeaders Strict-Transport-Security: max-age=15552000; includeSubDomains; preload;

}

 1. The age parameter tells the browser how long this rule must be cached.
 2. The includeSubDomains should only be added if you want to apply HSTS to subdomains too.
 3. The preload parameter is used for inclusion in Google Chrome’s preload list.

Read More: HOW TO CHANGE TIMEZONE ON LINUX SERVER
Follow US on Facebook / Twitter  for update.