How to setup QUIC.CLOUD CDN on a WordPress site?
Overview of QUIC.cloud
QUIC.cloud is a highly optimized CDN (Content Delivery Network) created by LiteSpeed Technologies. Currently, only WordPress can use this network. In this tutorial, we will see how to setup QUIC.CLOUD CDN on a WordPress site.
Table of Contents
- Why QUIC.cloud?
- Prerequisites
- Link QUIC.cloud to WordPress
- Request a Domain Key
- Link to QUIC.cloud
- Enable QUIC.cloud CDN
- Enable CDN and get CNAME Records
- Update DNS
- Verify If CDN is Enabled
- Unable to Fetch Server IP (Optional)
Why QUIC.cloud?
LiteSpeed Cache plugin of WordPress is always in sync with the QUIC.cloud network and it knows when to invalidate your cache so that end-users won’t receive outdated data from the edge servers, which makes it the only full-page cache CDN for WordPress with an intelligent purge.
It will make your website faster and more secure and your website will be cached on servers all around the world making its response rate faster to end users around the globe. When a user request data from the website, a response will be given from the user nearest located server rather than your main server which is available only in one location, which basically speeds up your website.
Prerequisites
- WordPress Site
- LiteSpeed Cache WordPress Plugin (Read our LSCache WordPress guide to setup LSCache plugin)
Link QUIC.cloud to WordPress
To setup QUIC.cloud on WordPress, First step will be in the WordPress,
Request a Domain Key
- Open your WordPress site dashboard and Navigate to LiteSpeed Cache and select General.
- Under General Settings tab click on the Request Domain Key button, which is located on the right side of the Domain Key Text Field.
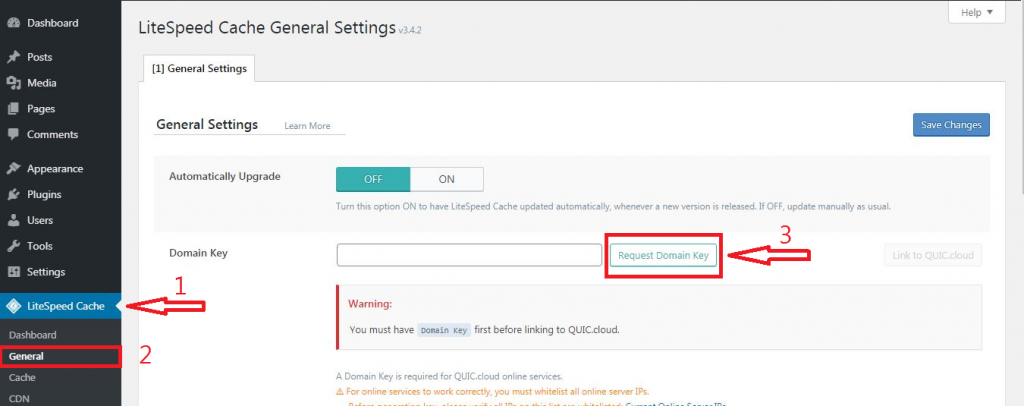
After doing the above step, You will see a notification at the top informing you that your request has been made, please wait for the result.
Refresh the page and you will see that your Domain Key Text Field is updated with the new generated key and Link to QUIC.cloud button is enabled.
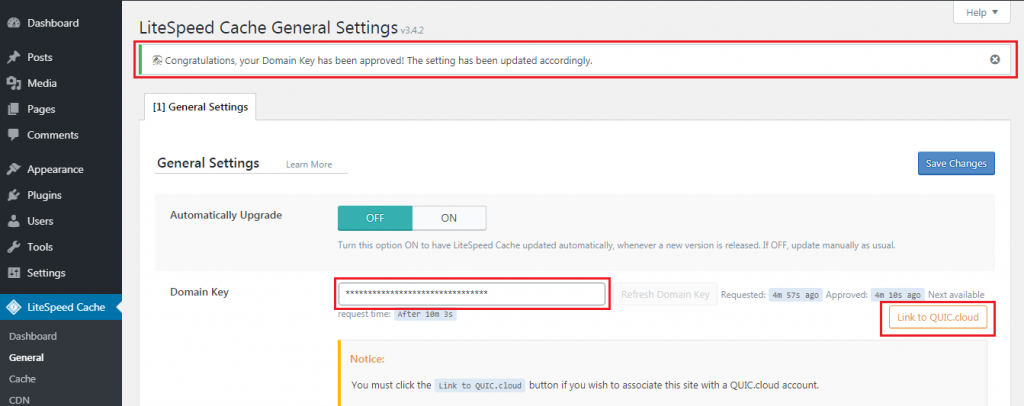
Link to QUIC.cloud
After completing the above step, we will have to link the WordPress site to QUIC.cloud account.
- Click on the button Link to QUIC.cloud
You will be redirect to QUIC.cloud to Log In / Sign Up
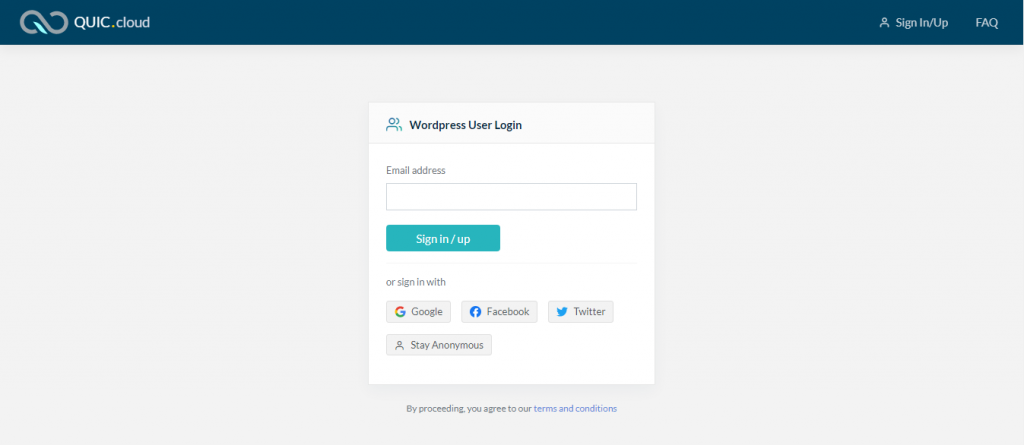
Enter your Email, If you already have an account you will be signed in and your WordPress site will be automatically linked to your QUIC.cloud account and then you will be redirected back to your WordPress Dashboard.
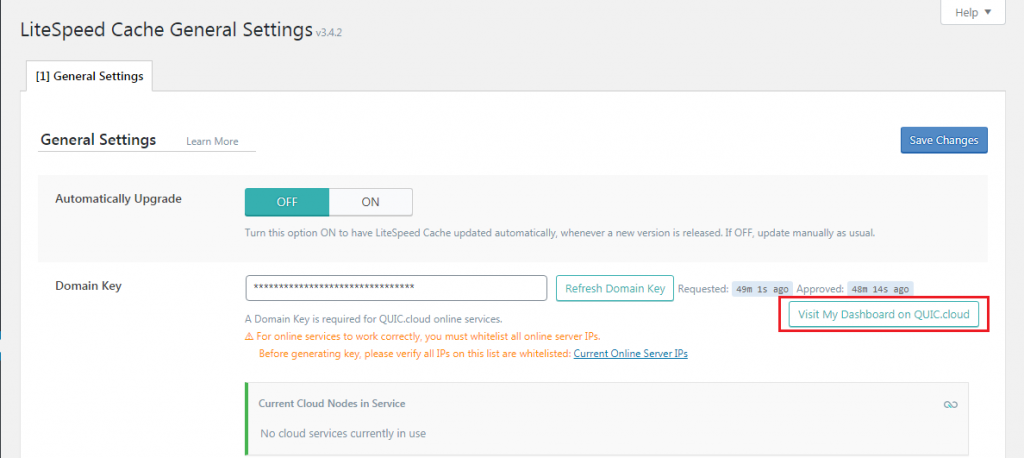
Visit My Dashboard on QUIC.cloud button verifies that your site is linked to your QUIC.cloud account.
Now, Your WordPress site is linked to QUIC.cloud account and you can use most of its features like image optimizations and critical CSS generation but CDN is still not in use. To Setup CDN, we will have to make some DNS changes.

Enable QUIC.cloud CDN
Now your WordPress site is connected to your QUIC.cloud account but it is still not using the CDN. To Enable usage of CDN, you will have to point your domain DNS to CNAME which will be provided by QUIC.cloud.
Enable CDN and get CNAME Record
- Go to your QUIC.cloud account settings and select the website you would like to enable CDN for.
- Select the CDN tab and click on the button Enable CDN
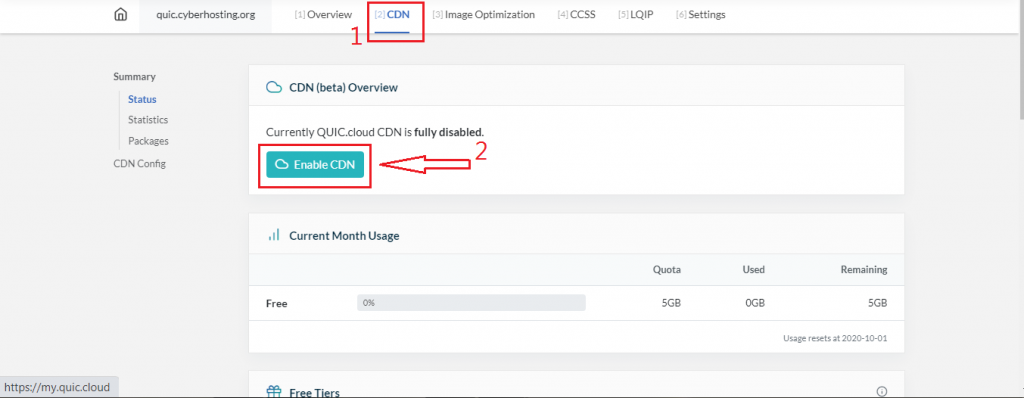
QUIC.cloud CDN will be enabled for the website you selected and you will be provided with the CNAME records. You will have to point your website to this CNAME to use Full QUIC.CLOUD CDN services.
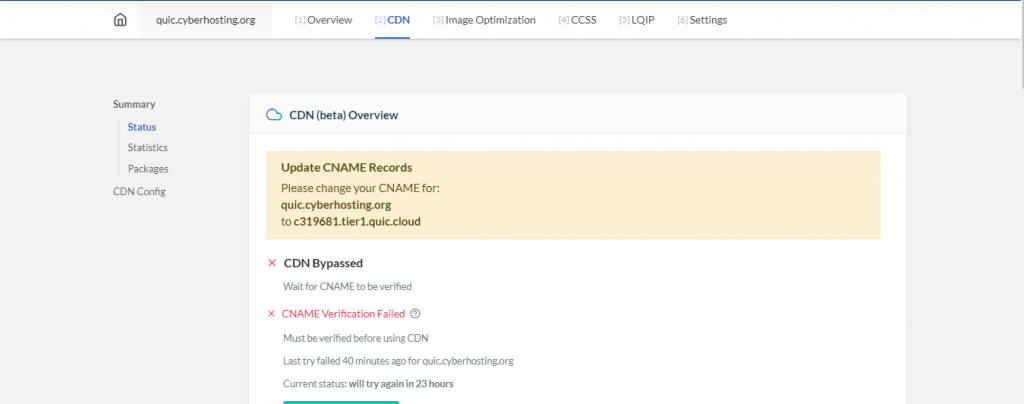
Update DNS
Now to enable CDN effect on your site, Head over to your domain DNS settings and make sure your domain points to the CNAME provided by QUIC.cloud as shown in the above image.

and that is it! Your website is now using QUIC.cloud Content Delivery Network ( CDN ).
Verify If CDN is Enabled
Still curious, If your site is using the CDN or not? Well, There is a way to verify that your site is using QUIC CDN.
You can use HTTP/3 Check to verify it. If your site is using the QUIC CDN and it is working properly, you will see something like this as shown in the image below.

To make full use of QUIC.CLOUD, read our article -> How To Optimize WordPress Site Using LSCache Plugin
Unable to Fetch Server IP
This topic is optional for those who face this error.
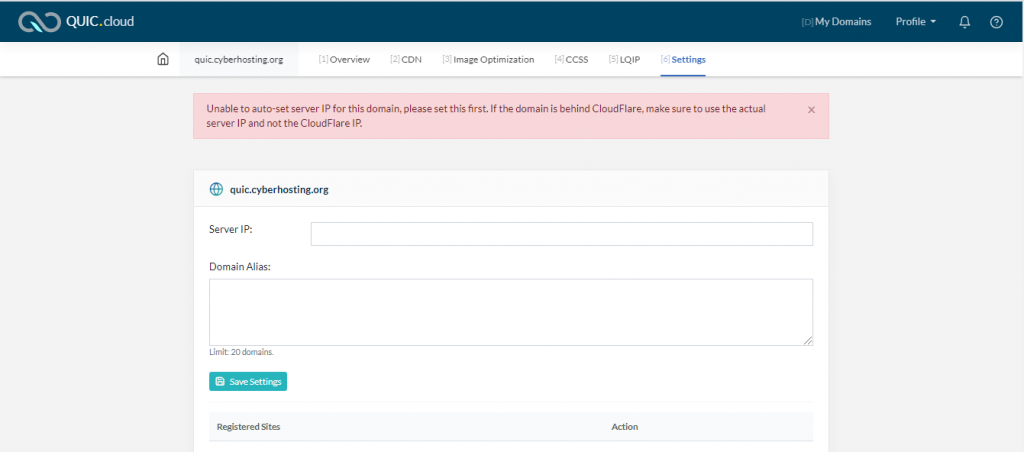
Well, There is a chance some of you may have come across this error (shown in the below screenshot). There is no need to worry about it. When you link your site to QUIC account it fetches your Server IP (through your website URL), where your site is hosted, to enable its CDN services. But,
In some cases your website is under a proxy to hide your actual Server IP from its visitors, so QUIC.cloud can not fetch it correctly and shows you this error.
It has a very simple solution, All you have to do is Paste your Server IP (where your site is actually hosted) into the server IP block you see in the below screenshot and Save it.
It will be fixed, Simple as that!
Enjoy Boosted site by QUIC.cloud!


